
Grafana Cloud: Logs
(4 Pillars of Observability Part #3)
Author: Oscar Moores
Release Date: 13/04/2026
Grafana - A Recap
This blog focuses on logs, what they are and how you can use them in Grafana. To understand what logs can do in Grafana Cloud it is preferable to have an overview of what Grafana does and where logs fit into it – This has been covered in a previous blog I have written on Grafana Cloud which can be found here.
If you are interested in Grafana and observability then I have also written another blog on metrics in Grafana that you might find interesting.
As a quick recap, Grafana Cloud is an end-to-end visualisation and observability tool. From collecting and connecting to data through processing and storing it, all the way to visualising and alerting data. Grafana Alloy lets you collect Metrics, Logs, Traces and Profiles (The 4 Pillars of Observability) and store them in Grafana’s own scalable and highly available storage solutions, hosted and managed by Grafana Cloud. The data can then be queried from these stores (and many other compatible data sources) to populate dashboards and alerts.
When used to its full potential, Grafana lets you identify problems when they occur in a distributed system and then investigate why the problem has occurred – in other words, create an observable system.
Logs and Their Structure
Logs are typically composed of metadata and the actual log message. The metadata is the context of the log and often includes information about the system generating the log or information about the log - the region the application is deployed in, process id or log level just to name a few examples. The logs message will be about what is actually occurring which can take the form of a line of text about an API call, or a stack trace detailing a fatal error. The metadata is what will help you narrow down which logs can help you troubleshoot a problem and the message will contain information about what the problem is and can help lead you to a solution.
A key feature of logs for troubleshooting problems is log levels: a piece of metadata included in a log that tells you how serious the log is. Log levels can range from DEBUG and INFO which provide information about whatever an application is currently doing like making an API call or running a function, to WARN, ERROR and FATAL - indicating some problems of varying severity. In Grafana queries can filter logs based on these log levels (and other labels) so you can find logs relevant to the problems you are trying to solve.
It is worth noting that when it comes to observability logs can be a brilliant arrow in your quiver but observability isn't the only target you can shoot your metaphorical arrows at. As logs are essentially just lines of text it is incredibly easy to generate them and useful for a wide variety of use cases (not just observability). Some example non observability use cases could be sending batches of statistics to analyse or ingesting business events like sales.
Storing Logs with Loki
The Grafana stack has its own databases for storing Metrics, Logs, Traces and Profiles and in the case of logs the database is called Loki - It is worth mentioning that Grafana cloud includes a generous free tier that includes 50 GB of monthly ingestion for logs, traces and profiles as well as a hefty amount of usage for many of Grafana's other features such as k6 load testing, synthetics testing and kubernetes monitoring.

Scalability
Whilst Loki (the log storage solution) does not share much with its namesake, Loki (Norse god of mischief, blood brother of Odin and general prankster) there is one ability they both share. In mythology Loki is known for his ability to shape shift, able to transform into creatures as small as a fish or as great as a bear - something (rather tenuously) Grafana Loki is also able to mimic!
Due to having a distributed architecture Grafana Loki is able to scale incredibly easily, a small setup being suitable for personal projects or testing can shape shift into an enterprise grade log storage set up with ease. And one of the best things about this scalability, it’s not your problem!
Being fully managed in Grafana Cloud all the hassle and worry about scaling is taken out of your hands and handled for you. This means you can spend more time using your logs and less time worrying about how you are going to store them.
Retention
With Loki in Grafana Cloud retention can be as simple or complicated as you want. You want to store logs for longer? Contact Grafana Cloud support and they can increase Loki log retention in 30 day increments so you can keep them for however long you need. But whilst laying things out like this isn’t wrong by any means, it covers up some interesting possibilities for retaining log information.
Keeping logs in Loki has an associated cost and it isn’t always the best value if you aren’t using these logs. Say your observability setup only ever uses the last month of logs, but for compliance reasons you have to keep the last years worth of logs. In an ideal world you could keep logs in Loki for 1 month and then store logs from the last year in cheap cloud storage like an S3 Glacier bucket.
Well as it turns out we may live in that ideal world because with Grafana Cloud Logs Exporter you can do exactly that! You can point it at an AWS S3 bucket (other cloud providers are available) and it will continuously export your logs to that bucket, providing a cheaper way to retain logs outside of Loki.
Recording Rules
There is one other tool in Grafana's Batman style utility belt for retaining logging information: Recording rules! What these do is run a query at regular intervals to create a new metric. Now this doesn’t sound like anything to do with Log retention, in part because it's not actually retaining any logs but this powerful tool provides an alternative way of using logs long after they are ingested.
Using recording rules you can extract key information from your logs, store it as metrics and keep a low log retention time. This can give you the best of both worlds, a lower bill from log retention and you can still keep crucial information/statistics from logs so you can look back and analyse it if needed.
Now whilst I have grouped Recording Rules into this section on log retention, this is by no means where their uses end. The way they are built into Grafana means you can build them with queries from any data source - metrics, logs, traces, profiles, even SQL databases. Anything you can query in Grafana you can use to create a recording rule.
Labeling and Streams
In Loki as with Prometheus/Mimir you will notice you can query telemetry by their labels, a useful way of narrowing down logs or selecting specific dimensions of your metrics. This isn’t just a way of narrowing down what you are searching for though, it is a key architectural component of Loki (and Mimir/Prometheus) and how you use these labels can have a significant impact on performance and cost in Grafana Cloud.
When logs are ingested into Loki each log is placed into a stream based on the logs labels which results in a stream of logs for every unique combination of labels. This is great! It means when you search for a log based on its labels Loki knows exactly where to look, in the stream with the matching labels.

This does come with best practices though, in the example above there are 2 labels with 2 possible values each leaving 4 possible unique combinations of labels. This means there can be up to 4 log streams. If we added a 3rd label with 2 possible values it means there are 8 unique combinations of labels and 8 possible streams. It’s easy to see how the number of log streams could explode if we keep adding labels.
Lets take this to the extreme, what if we added a label with not 2 possible values but 1000s causing the number of streams to increase by a factor of 1000. If we went even further and added another one of these labels we quite quickly go from a number of log streams in the 10s to possible millions of unique label combinations.
This is not a far-fetched proposition either, all you would have to do is add an IP address label and suddenly you have a new stream for every IP in your logs, causing serious performance issues with your Loki.Searching for these high cardinality attributes is still possible though, you just don’t want to add them as labels.
All of this is in line with the way Loki was built, it is partially indexed. It was never intended to index these high cardinality labels, you should narrow down your search using other labels and then when you have a much smaller selection of logs you can then parse these and search based on fields like IP address. What this means in the long run is Loki doesn’t spend time or space on indexing every little label and focuses on ingesting logs at pace - making Loki faster and more efficient if you choose your labels carefully.
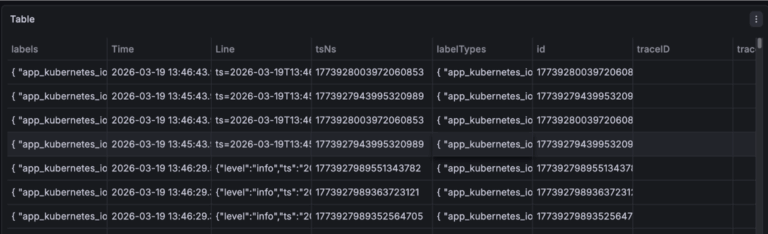
Dashboarding with Logs
When using logs to dashboard in Grafana the first thing you will probably think of is just displaying the logs - create a query that returns useful logs and put it in a visualisation that lets you look through them, some visualisations even let you filter them directly on the dashboard.
In Grafana though you aren’t limited to displaying plain ol’ log lines, when crafting your LogQL query you can use aggregation functions! By doing this you can turn a group of logs into a metric series, extracting statistics from them over time - As an example use case you can find the number of connection logs and the number of these logs that represent errors, letting you find the error rate of these logs as a metric.
Visualisations
Through log aggregation you can use metric visualisations like the time series graph but there are still visualisations you can use with plain simple logs.
Logs
The logs visualisation is very simple. It shows log lines and although it’s not as flashy as say a time series graph it does have a few tricks up its sleeve - you can change which parts of the log it shows, choose whether lines wrap round, change formatting and it'll even highlight the level of each log.

Table
Using the table visualisation you can display your logs in a clean organised format. If you want you can use this in exactly the same way as the logs, just displaying the whole log in the table but you can also use it to display specific fields or calculations based on specific fields. There is also a lot more customisation you can do with the table visualisation.
Each column in a table can have its cells customised. This can be simple, like changing the width or color of a cell or it can be more complex, like turning the cell into a gauge or a link.

Correlating with Logs
In an ideal observability set up you have your 4 pillars of observability: Metrics, Logs, Traces and Profiles. To get the most out of your observability set up you want each of your pillars working together - for example when you find a problem with metrics you want to be able to find the corresponding logs that can help fix your problem.
If you are looking through error logs you might want to jump to related logs to get a big picture understanding of what's going on. This jumping back and forth between telemetry is called “correlating”. There are several ways of going about this correlation business in Grafana ranging from manually looking for related logs/metrics, to data source wide links that take you to related data.
Manual Correlation
Manual correlation is the simplest to understand. If you have a set of metrics you are looking at you just take the labels and run a search for logs using the logs equivalent labels over the same period of time. Bam, you have your logs. Bonus points if you use the “split” feature in explore so you can simultaneously look at your metrics and the logs you correlated. This can also be done from logs to metrics, traces to logs, whatever way you want it.
Doing manual correlations (and investigations generally) is much easier if you have consistent labelling between your telemetry. If possible you want your label names to be as close as possible - when trying to track down the cause of an issue you don’t want to be spending your time wondering what your logs equivalent of your metrics “cluster” label is.

Data Links
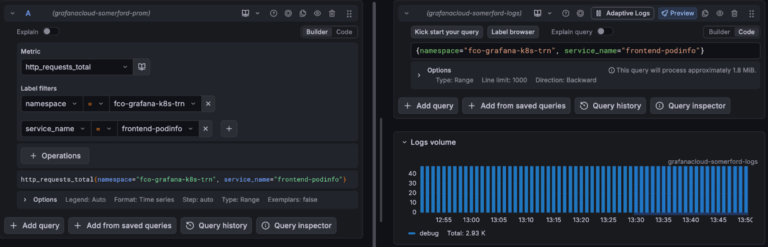
Manual correlation is done in the explore menu, great for when you are creating queries to investigate a problem, but often in Grafana you aren't writing your own queries but using a dashboard. This correlation niche is partly filled by data links.
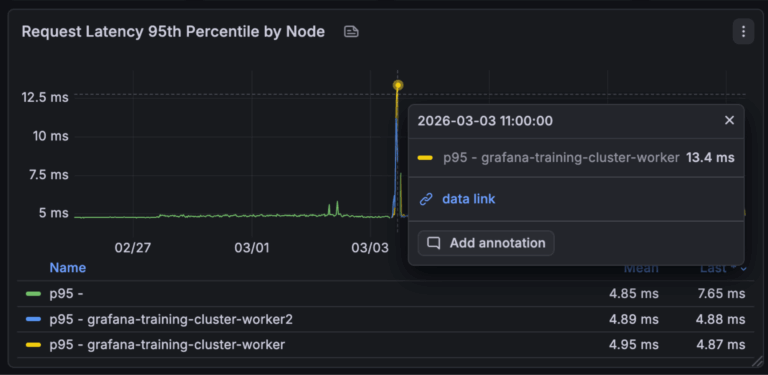
An example scenario where you might use data links. You have a kubernetes monitoring dashboard and a visualisation showing the http error rates by kubernetes pod, you want to find the logs associated with these http errors. You can set up a data link on this visualisation so when you hover over the error rate for a particular pod it will take the labels for this pod and take you to a query or dashboard that is using these labels.
The only downside (depending on how you look at it) with data links is they must be created in advance, so when creating your dashboards you need to anticipate when people might want to jump from one dashboard to another or to a query. Having to create these manually though provides a great tool for curating paths through your dashboard, starting with an overview and letting you get to the more low level dashboards and telemetry whilst narrowing down labels to find the specific data to investigate a problem.
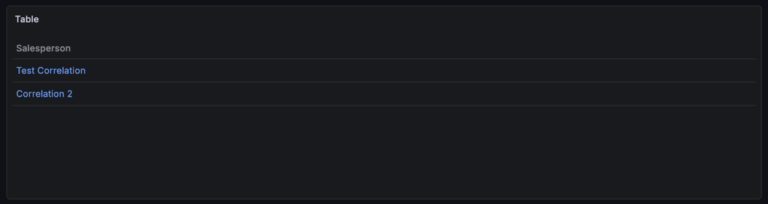
Correlations
Last but very much not least, the correlation feature in Grafana can be used to correlate between entire data sources (shocking). In the correlations menu you create a correlation for a data source, create a query and associate it with a field. Whenever a field with this name is found from its associated data source it becomes a link you can click that runs the query.
An example of when this might be useful. You have a set of logs and in the logs an application name is returned, you can set up a correlation to run a query for metrics related to the application name. As this applies across all dashboards and queries this is much less rigid than data links and quicker than manually moving between your telemetry manually.

Each of these methods of correlating data has its place in Grafana and a good observability set up can take advantage of all 3. Data source wide correlations for data you regularly need to jump between, data links for guiding through a dashboard whilst maintaining context and then for when you have a more niche problem you are troubleshooting manually looking for corresponding telemetry.
Adaptive Telemetry
One of Grafana Cloud's most interesting features is adaptive telemetry. It essentially gets rid of unused logs, metrics and traces so you aren't billed for them. At its core adaptive telemetry is just a set of rules defining metrics, logs and traces to keep or get rid of. When telemetry is ingested into Grafana it is checked against these rules and dropped/kept based on these rules.
A good set of rules means you can drop unused or high cardinality labels from your telemetry before it even gets into your Grafana environment, which can result in significant savings with no impact on what you can get out of your data.
Getting adaptive telemetry to work is just a question of creating a good set of rules, luckily the brains at Grafana have made it a good bit easier to get started. When you go into the adaptive telemetry menu (split into metrics, logs and traces) you will find a set of recommended rules generated by Grafana based on your current usage of metrics, logs and traces.
When I first saw this my immediate thought was “what if one of these recommendations removes data I need”, luckily this worry was assuaged when I looked a tab over and saw that you could configure exemptions. This means if there are key metrics, logs or traces you don’t want touched you can specify. Worth noting, when deciding what to drop adaptive telemetry takes into account if its queries, so data you are using won’t get touched.

How Logs Fit into Grafana and Observability
Logs play an important role in Grafana (as well as observability as a whole), whilst metrics tell you how things are doing, it’s logs that tell you why there is a problem - an essential part of observability.
As an example, you have a set of dashboards to monitor the health of an application. On the dashboard you see a spike in metrics and decide to investigate. You can use a data link on the visualisation to find the logs associated with this metric and investigate to find the cause of the metric spike.
Grafana’s managed Loki datasource means you can ingest as many or as few logs as you need without worrying about how it will scale, all you need to do is make sure your logs haven’t got high cardinality labels (to minimise cost and maximise performance) and the labels they do have are actually useful for troubleshooting.
Then on your dashboards you can create visualisations displaying your logs or you can create queries that aggregate them into metrics and visualise these.
Once your dashboards and queries are created you can jump between your data and streamline investigations through the use of correlations and data links.
In future blogs I will be looking at the last 2 Pillars of Observability: Traces and Profiles then discussing where they fit into Grafana and observability as a whole.
